Time Clock
V2.1
User Manual
TABLE OF CONTENTS
3. SETTING
UP THE TIME CLOCK SYSTEM
3.3 Setup -
Auto IN/OUT Time (For PC Based ��CLOCK�� Reader Only)
5.12 Add,
Edit or delete records
6.1 First In /
Last Out Attendance Report
6.2 Two
Sessions Attendance Report
8.1 First IN /
Last OUT Spreadsheet
8.2 IN / OUT Pairs Spreadsheet
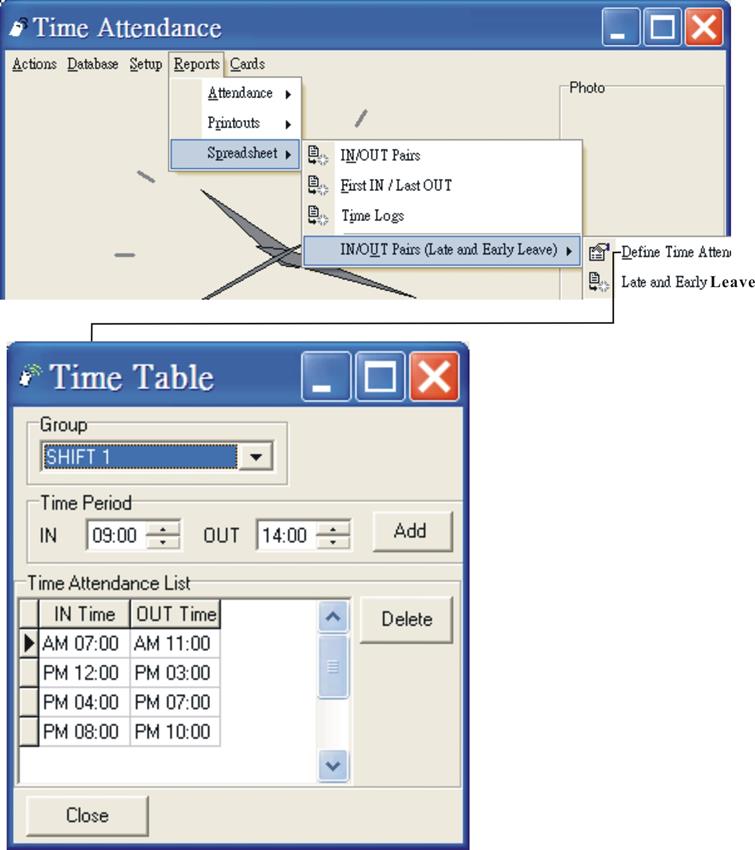
8.4 IN OUT
Pairs Late & Early Leave Spreadsheet
1. TIME CLOCK
This
software is designed exclusively for using with AVEA��s RFID proximity products from AVEA International Company Limited
for time recording and attendance.
While
presenting an AVEA��s ID card to the
reader connecting to the computer with Time
clock (Windows), the system
will
¨
Stamp the date, time and card ID number into the computer database
¨
Show up the associated picture with the specific
ID on the computer screen
¨
Capture
the photo of the scene to avoid trick clocking
There are standard reports for attendance or
you may export data to MSEXCEL or TEXT format for further data processing like
payroll, appraisal, etc.
The system can manage up to 8 readers. Moreover,
system for more readers can be ordered separately.
Minimum System
Requirements:
¨ Windows XP or Windows 7
¨ Pentium II 600MHz or faster
¨ 256 MB RAM or more
¨ 500 MB free hard drive space or more
¨
CDROM
drive
¨ Direct X version 8 or above
2. SOFTWARE INSTALLATION
To install the Time
Clock software, please follow the steps:
¨ Download the Time Clock software from http://avea.cc/sw/tc.zip
¨ Unzip the file
¨ Execute the installer program tclock.msi
¨
Just follow the installation instruction to
finish the installation
The detailed installation manual for the Time Clock will be automatically installed into your computer.
You can read it by using the Adobe Reader.
3. SETTING UP THE TIME CLOCK SYSTEM
The state of most windows of Time clock will be memorized.
You may resize the windows according to your
specific needs.
To setup the system
correctly, you need to connect the AVEA��s reader to the USB or serial ports of
the PC. For serial port, it can be standard RS232 serial port (i.e. COM1, COM2)
or extended serial ports by USB to serial cables or add-on cards. But the COM
port must be 1 to 8. In case the COM port is mapped to
higher than COM8 for USB reader, you need to modify it manually to COM8 or
below.
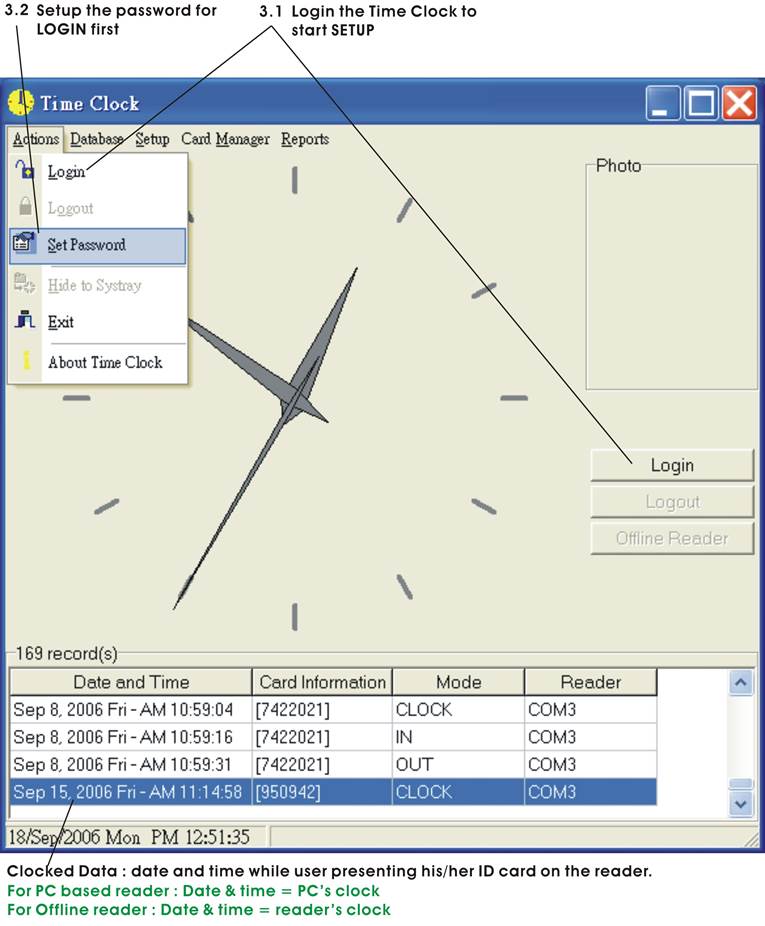
The password is
used to protect the system from illegal access to the system. Please set a
password for the system. If the password is forgotten,
there is no way to recover it. And you need to reinstall the software
again meanwhile all data and setup will be overwritten.
In order to setup the software and use the features of the software, you need to login. If password is set, you need to enter the correct password to login successfully.
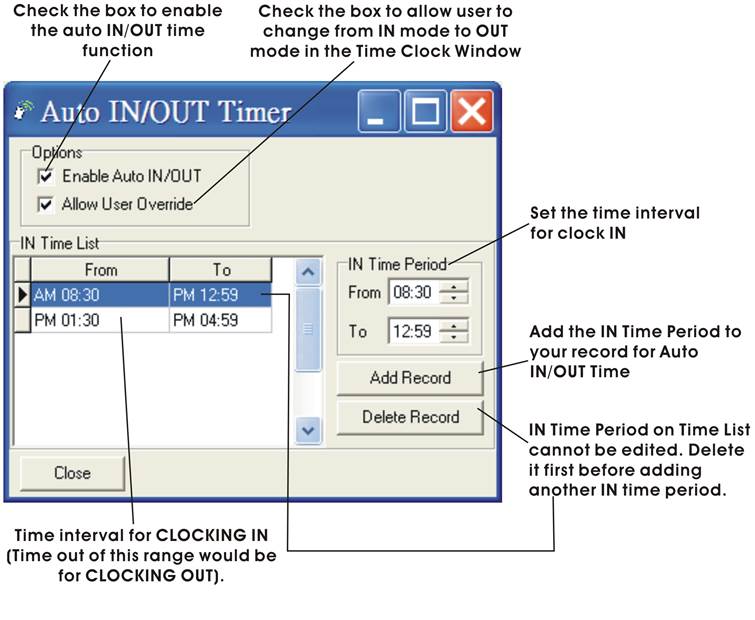
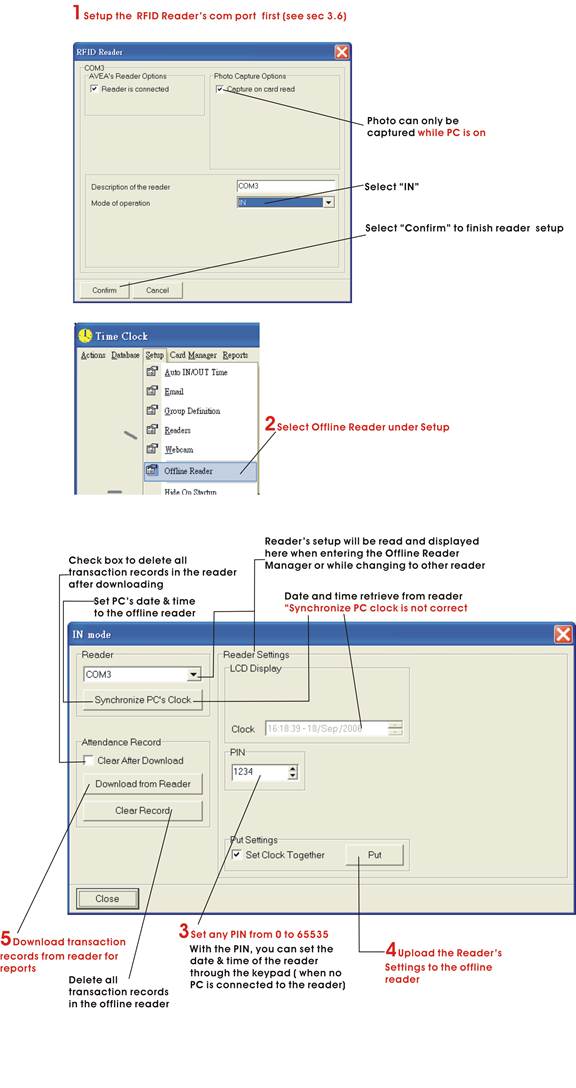
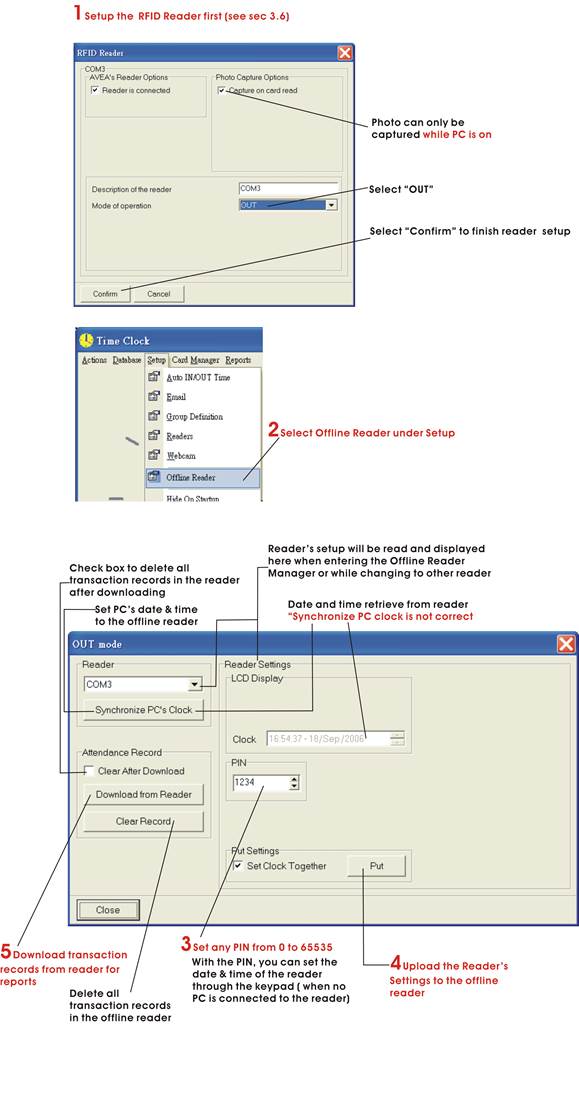
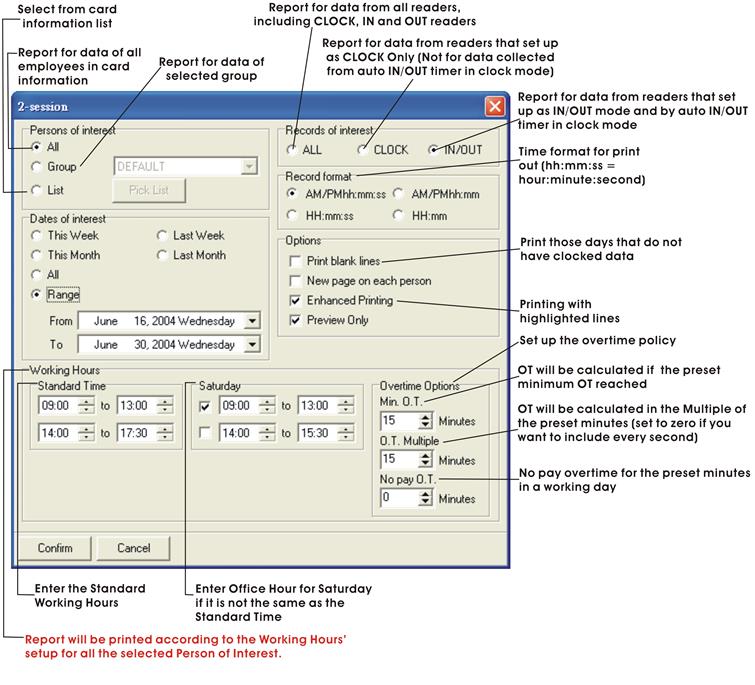
3.3 Setup - Auto IN/OUT Time (For PC Based ��CLOCK�� Reader Only)
Auto IN/OUT Time is a powerful feature for PC
based readers that are setup as TIME CLOCK in ��mode of operation�� of Reader��s
setup (see section 3.6). With this feature, a single PC based reader can be
used to collect data for clock IN and clock OUT. Hence, more accurate data can
be collected for reporting. (*This feature will not affect the data collected
from IN/OUT and offline reader.)
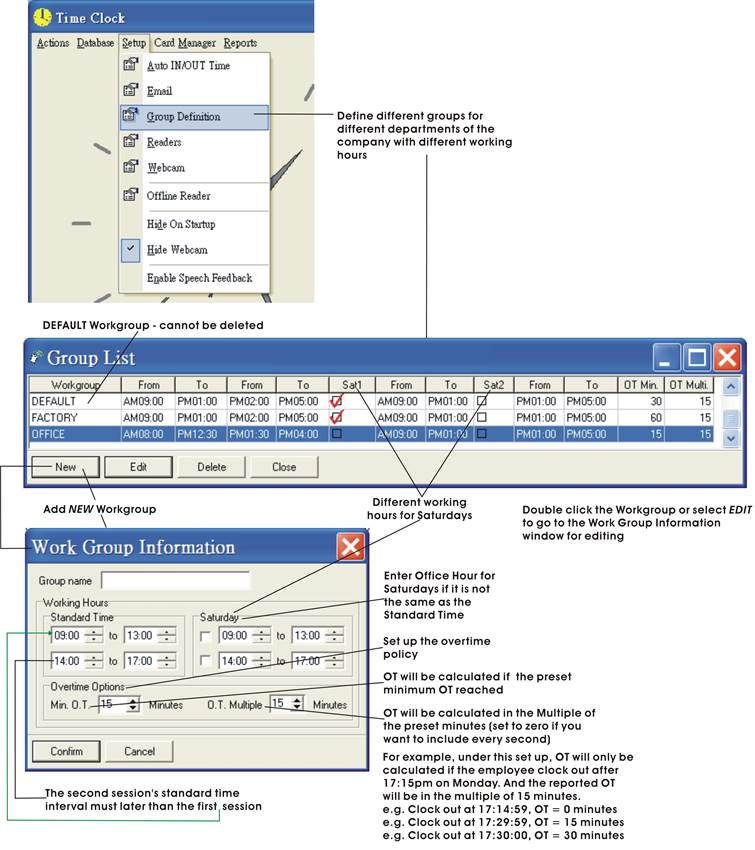
Group is used to
classify the members. So define the groups before entering the information for
Card Information. Each group may have different working hours for report
generation.
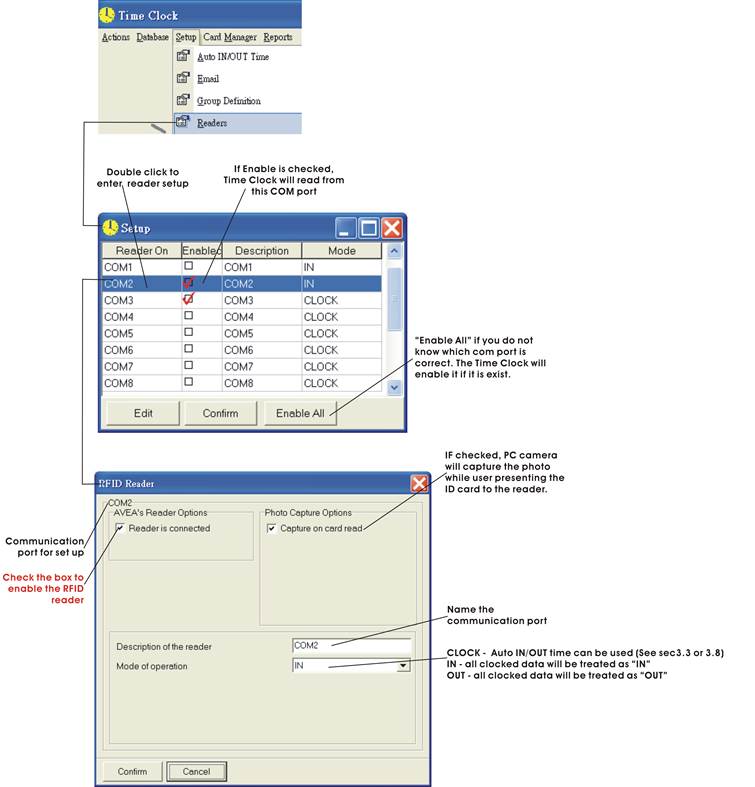
Setup
communication ports that are connected with AVEA��s
readers.
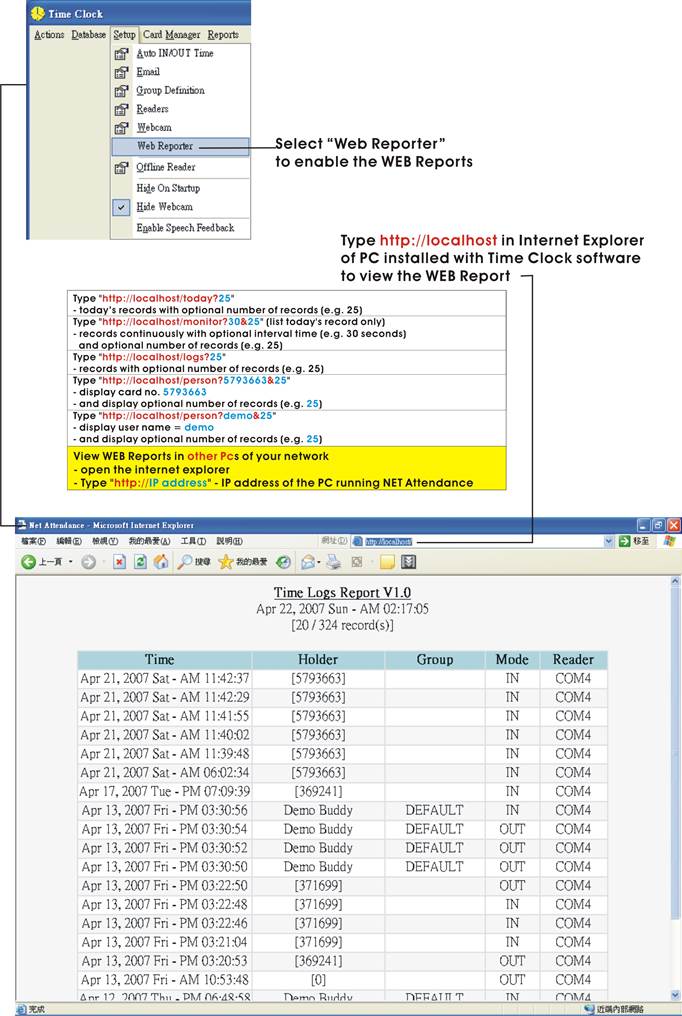
WEB Reporter is a
real time cloud attendance logs. It is a powerful feature for browsing your
employee��s clock IN clock OUT data anytime and anywhere from your network (LAN
or WAN). Various commands are supported to show different types of report.
For offline
readers with storing capacity only:
3.9.1
CLOCK mode:
use offline reader as Standalone TIME CLOCK for
time attendance
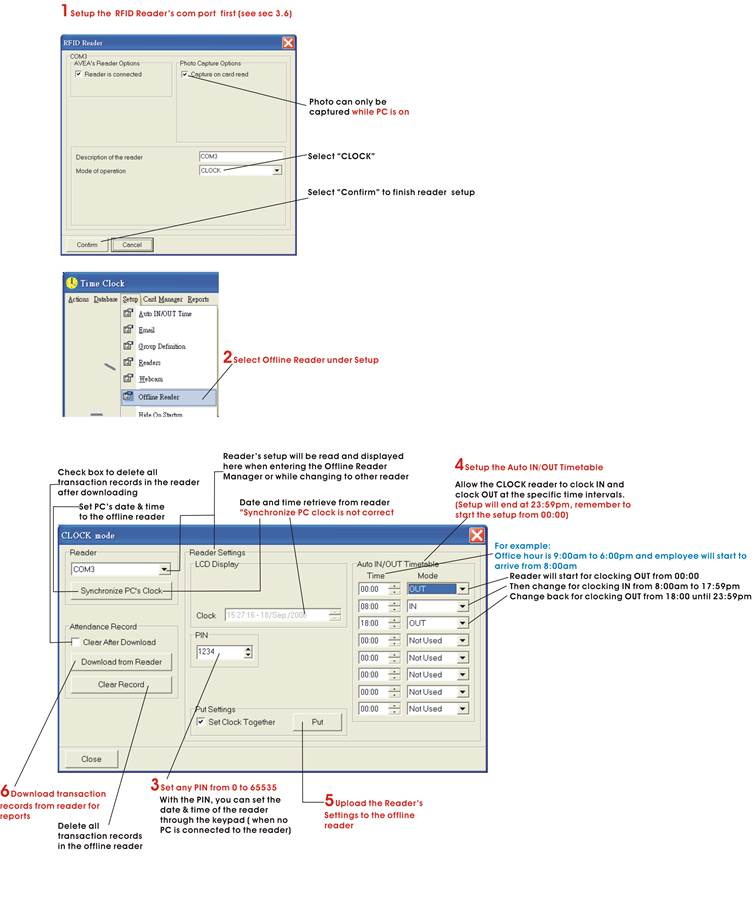
3.9.2
IN mode
: use offline reader for clocking ��IN�� only
3.9.3
OUT
mode : use offline reader for clocking ��OUT�� only
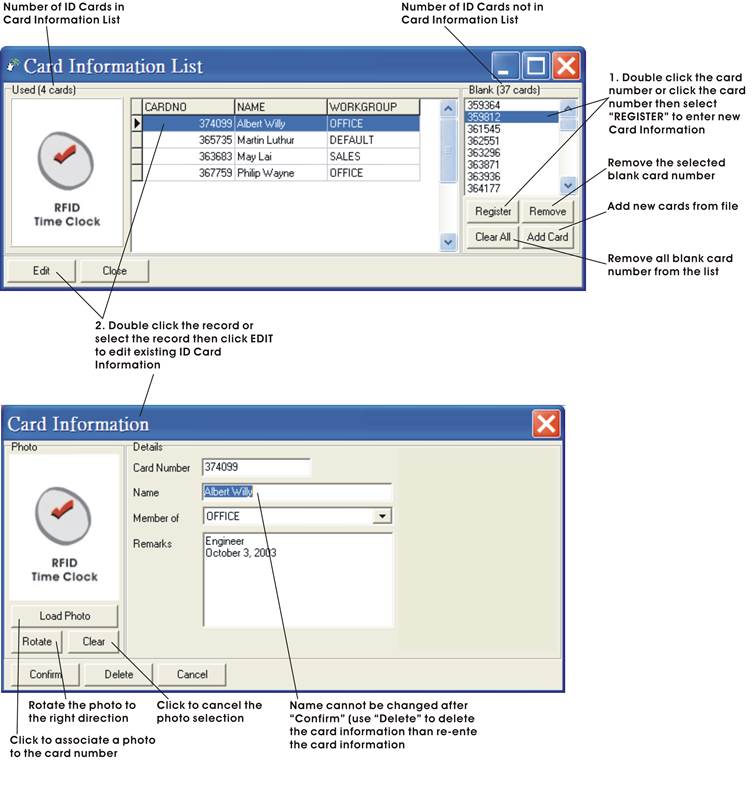
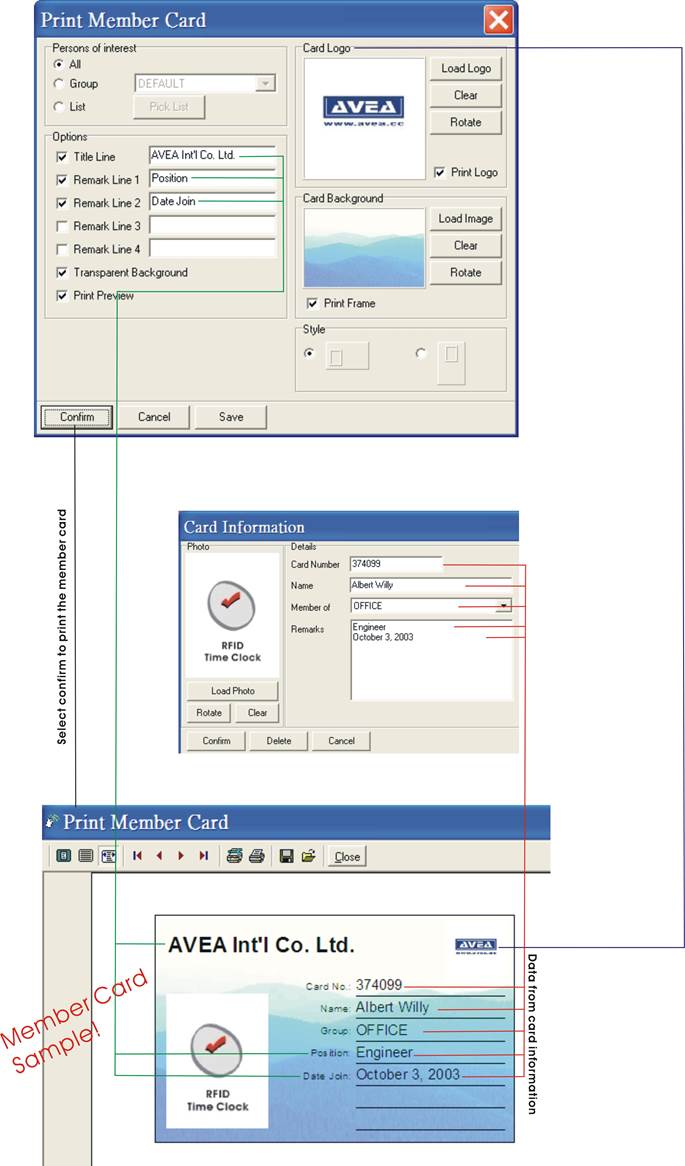
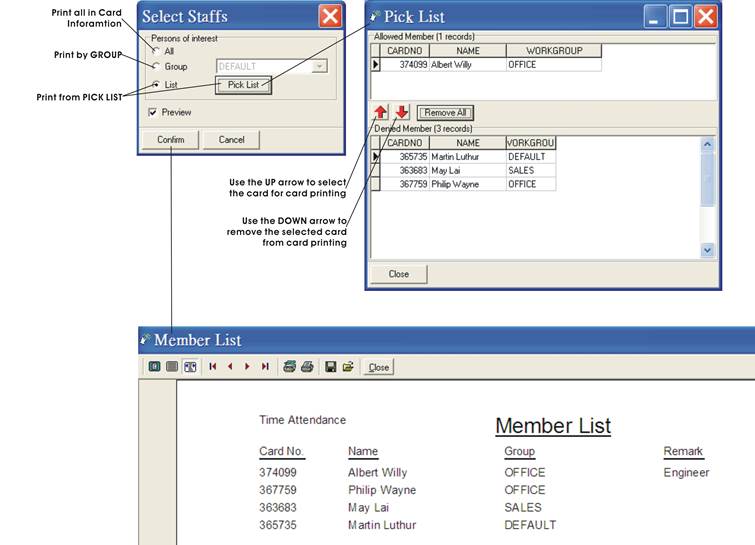
4. CARD MANAGER
The card manager is a utility to help the user to
create printed member cards for the pictured identification.
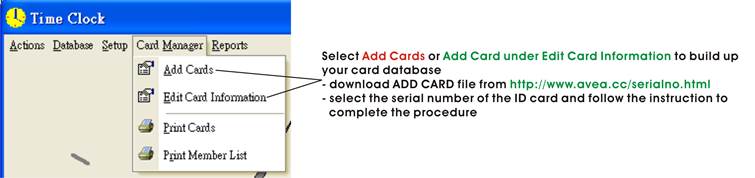
Design and print
your own employee cards to use with the ID card.
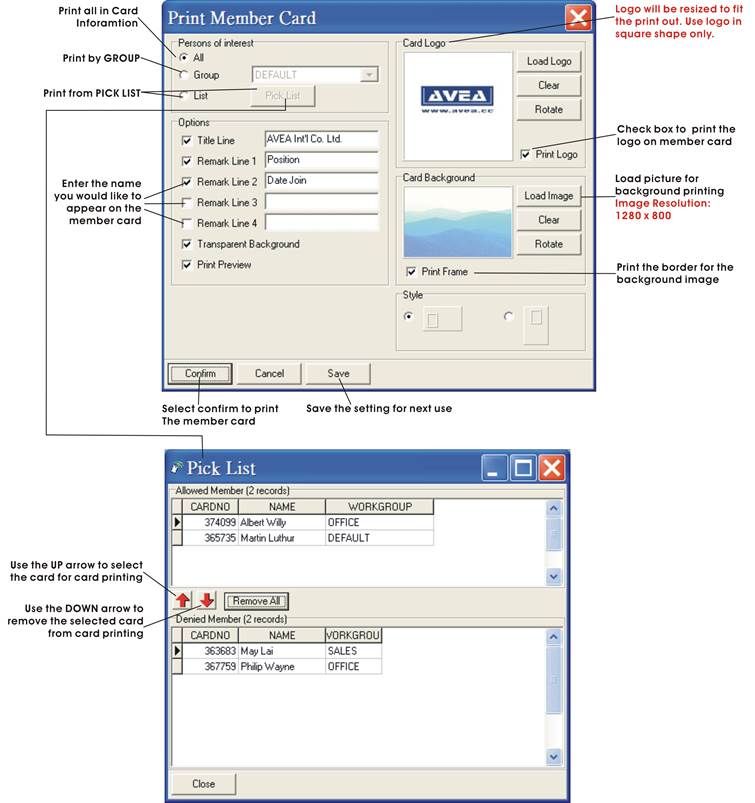
Member Card will be
printed according to the information from Print Member Card and the individual
Card Information.
5. DATABASE MANAGEMENT
Backup all ID card /
attendance records to your hard disk for future use. Use this
feature as a routine for increasing your data security.
Backup all system information in
Setup (including card information) to your hard disk for
future use.
Restore the log
records from the file of ��Backup Log Database��. It will replace and erase all existing
log records in Time Clock. Remember to use ��Backup Log Database�� to backup the
log data before ��Restore��.
5.4 Restore System Database
Restore all card and system information
in setup from the file of ��Backup
System Database��. The restored file will replace all staff
records in card information and system setup. Remember to use ��Backup System
Database�� to backup the data before ��Restore��.
5.5 Export To EXCEL File
It exports all data
from the database to a MSEXCEL file for further use or payroll calculation.

5.6 Export To Text File
Export all
attendance records to a text file in chronological order.

Erase all attendance
/log records. Remember to use ��Backup Log Database��
to backup the log data before ��Erase��.
5.8 Erase Staff Records
Erase all staff records in card information. Remember to use ��Backup System Database�� to backup the data before ��Erase��.
5.9 Format Database
Clean up the database. Erase all attendance records and card information. Remember to ��Backup Log Database�� and
��Backup System Database�� before ��Format
Database��.
5.10 Import Log Records
It imports the attendance / log records from
the backup file of ��Log Database�� and merges the log database into the local
database for reporting. Existing data in Time Clock will not be affected. For
example, staffs can clock their time at different locations for attendance
control. The head office collects the log databases from branch offices, and
then imports / merges them into the head office��s database for reporting.
5.11 Import Staff Records
It imports / merges the card information
from the backup file of ��System Database��. The existing card information will
not be affected. And, system settings will not be imported in this mode.
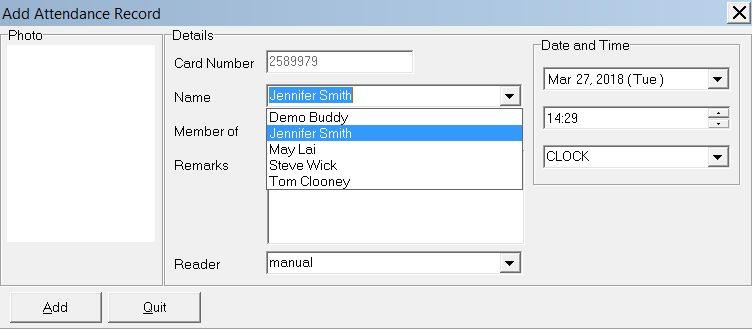
5.12 Add,
Edit or delete records
By right clicking your attendance record,
you may now add, edit or delete your attendance after login.
Add a new
attendance record:
Go to the record area, ��right click�� to
enter the edit mode. Select ��Add an Attendance Record��.
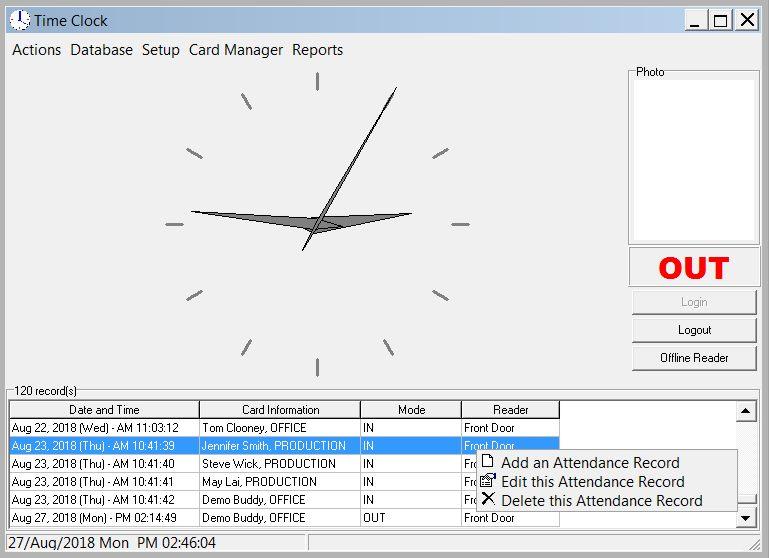
> Select ��Name�� for adding > Enter the
��Date and Time�� and ��Reader�� information > Click ��Add�� and Select ��OK�� to
confirm.
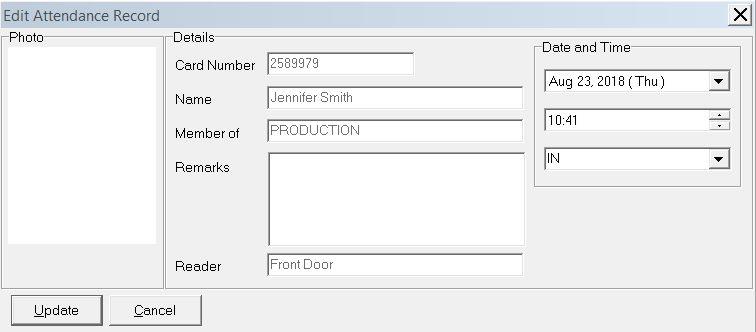
Edit an
attendance record:
Go to the record, ��right click�� the record
to enter the edit mode. Select ��Edit this Attendance Record�� > Enter the
��Date and Time�� and ��Reader�� information > Click ��Update�� and Select ��OK�� to
confirm.
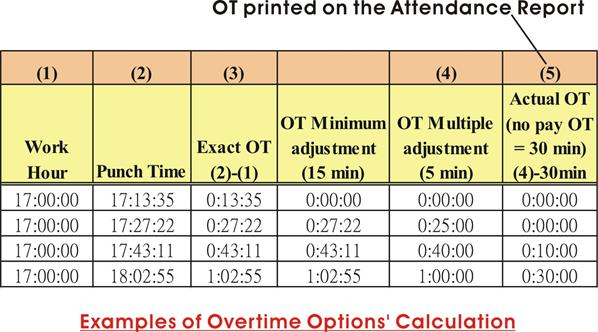
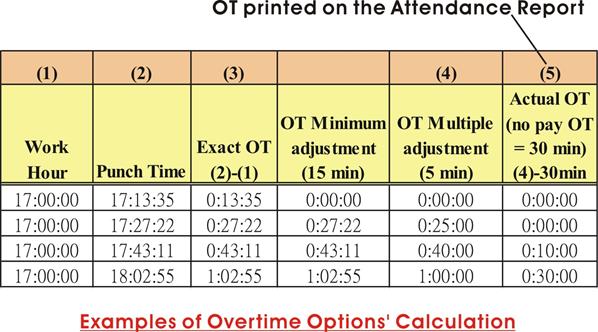
6. REPORTS �V ATTENDANCE
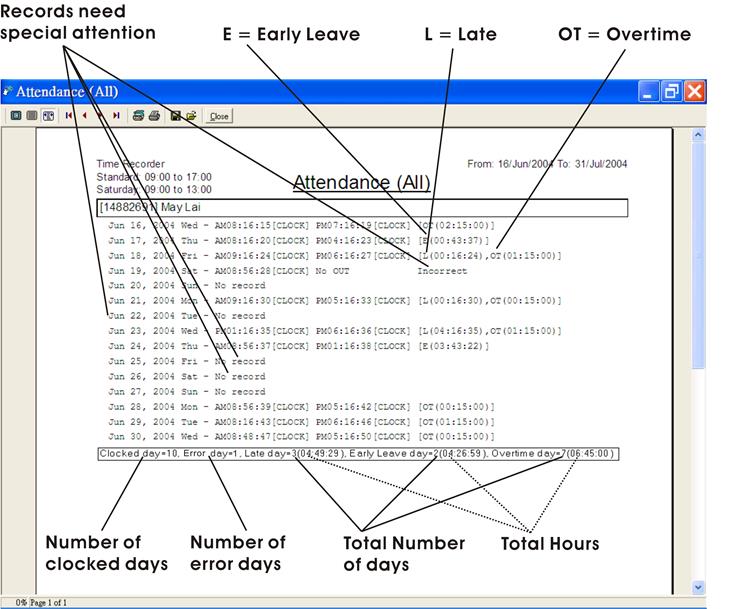
The attendance
report is generated based on the working hours defined by the user. The
attendance records are comparing to the working hours and calculate the late
and early leave information.
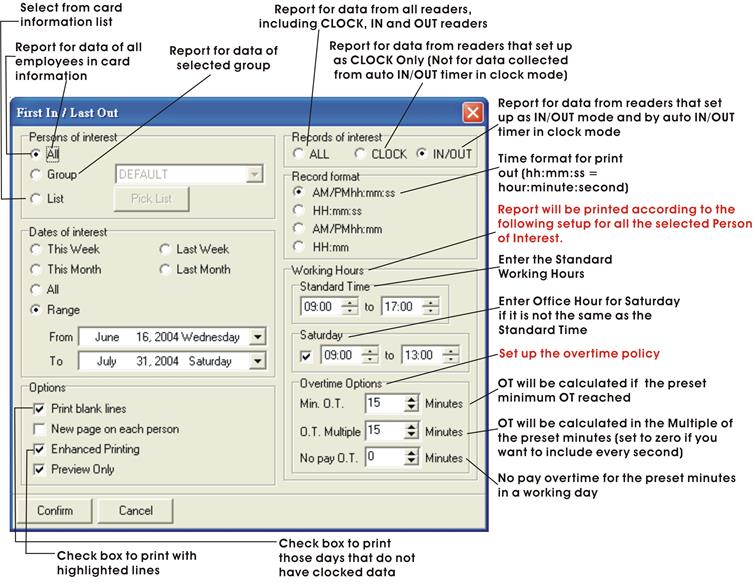
This report would
be great for those who use the readers for access control or time recording. It
extracts the first and last data (or first IN last OUT
data) in a day to calculate the Late, Early Leave and Overtime for
selected employees according to the Standard Working Hours and Overtime policy
for a specific period of date range.
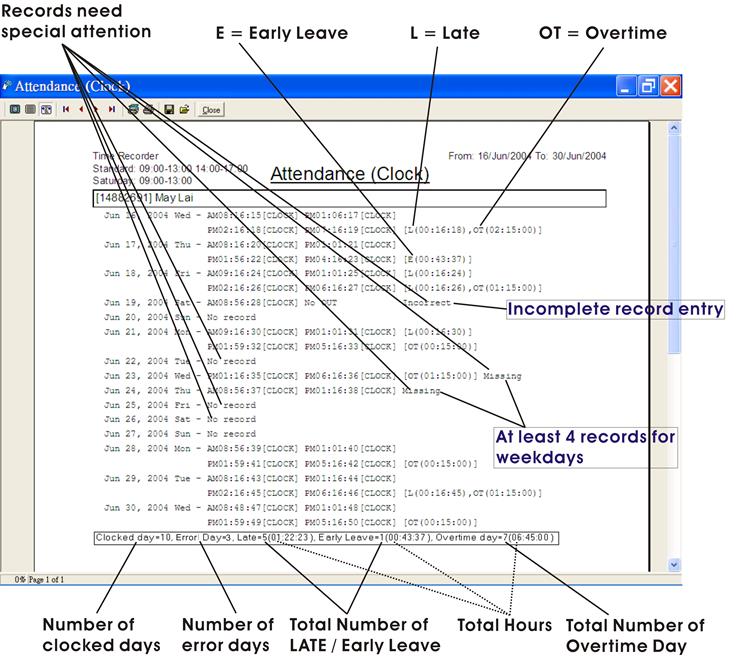
It extracts the first four data in a day (or first two data - depend
on the working hours�� setup) to calculate the Late, Early Leave and Overtime
for selected employees according to the Standard Working Hours and Overtime
policy for two sessions. Daily records that less than four times / two times or
more than four times / two times in a day may not be included in the
calculation. Reminder will be printed on the report.
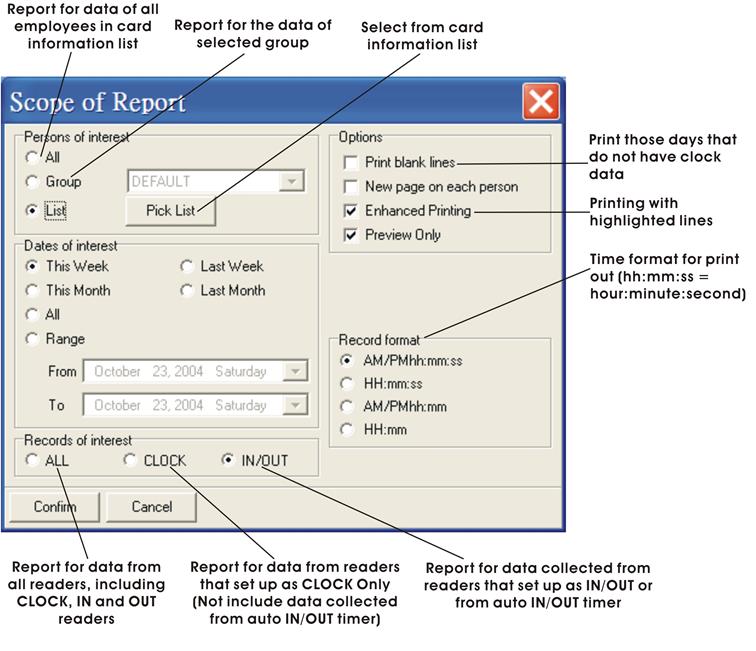
7. REPORTS �V PRINTOUTS
The reports are
generated from the attendance records according to the user selected options.
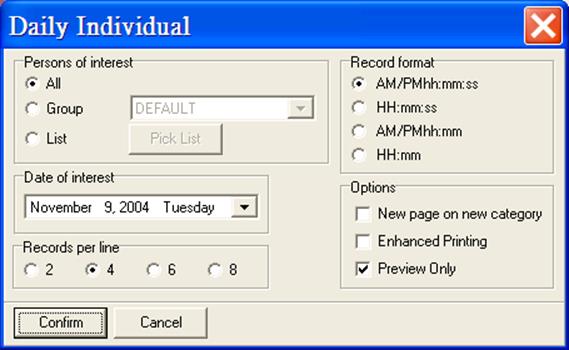
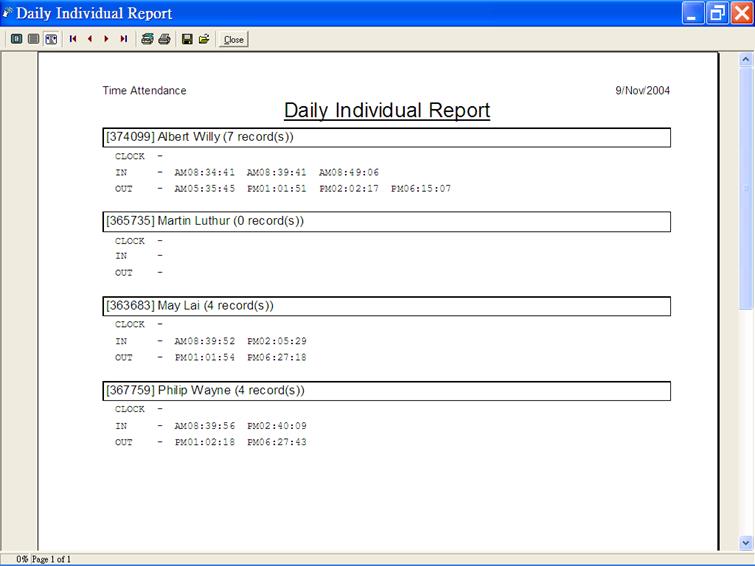
Report for
individual employee status at a specific date.
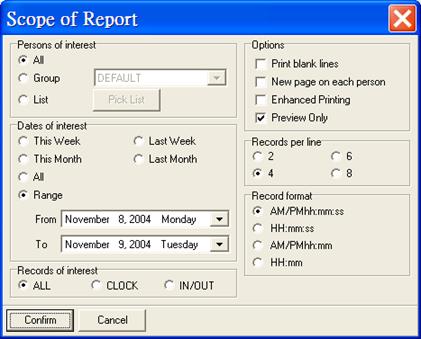
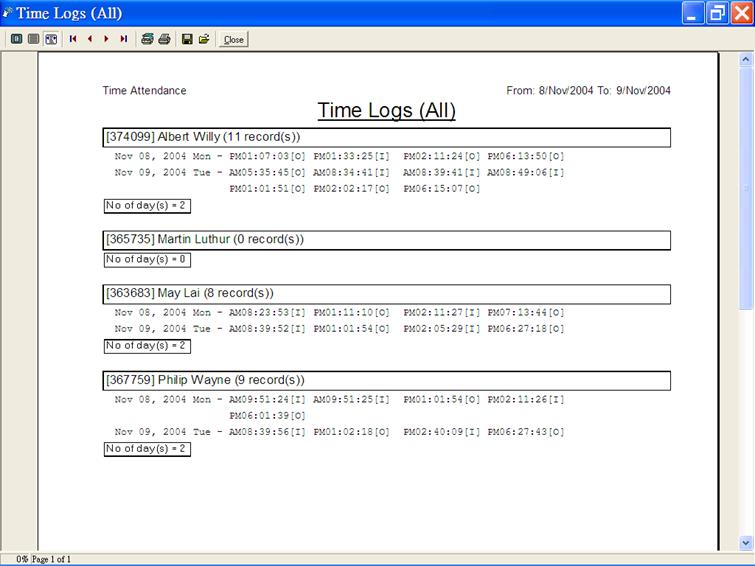
Report for all data
sorted by name according to selected readers at a specific date range. Number
of records and clocked days for that employee will be reported.
It is a detailed
Total Working Hours Report for employees of selected readers according to First
in Last out basis for a specific date range. The first data will be used as the
IN time and the last data will be used as the OUT time for calculation.
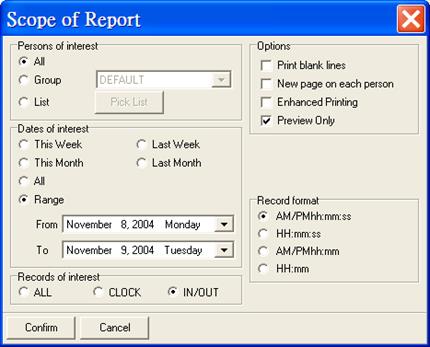
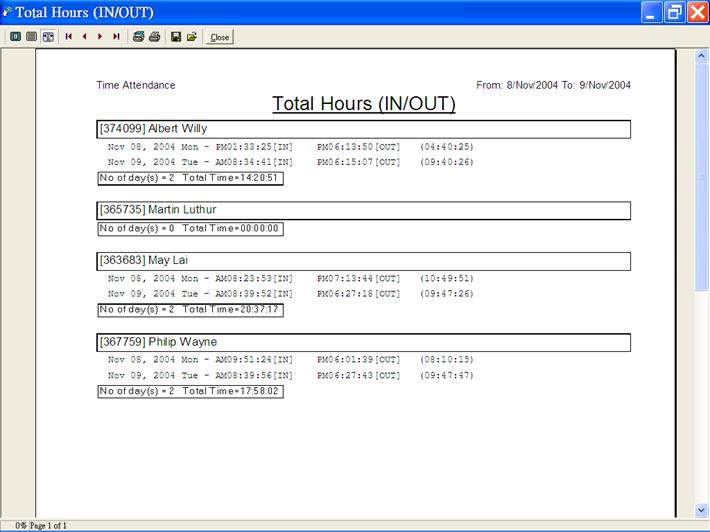 ** For IN / OUT readers�� report, IN and OUT
records must be matched in pair.
** For IN / OUT readers�� report, IN and OUT
records must be matched in pair.
Total Hours Detail
Report calculates all the time difference between two consecutive records in a
day for employees.
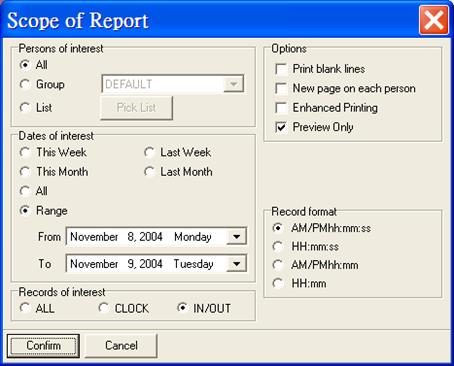
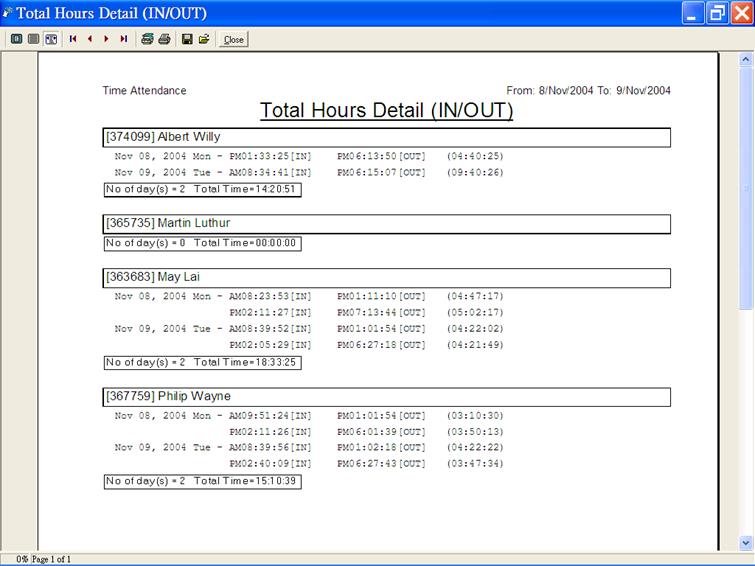
** For IN / OUT readers�� report, IN and OUT records
must be matched in pair.
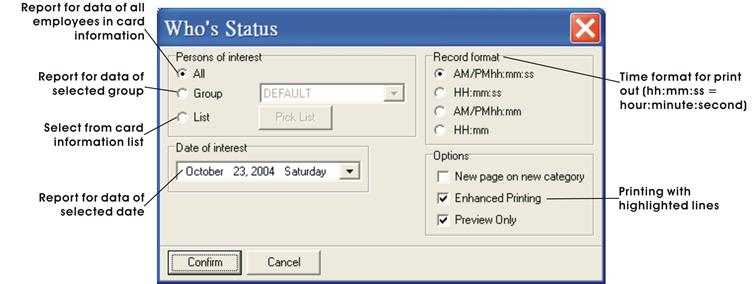
Report for finding
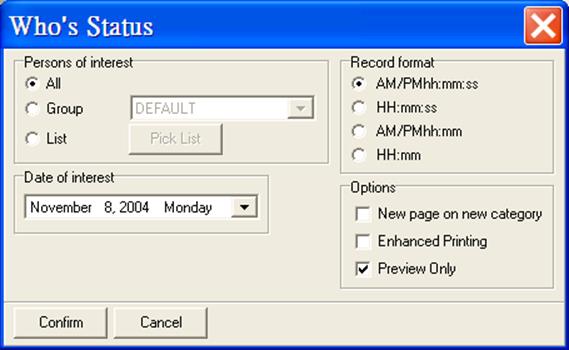
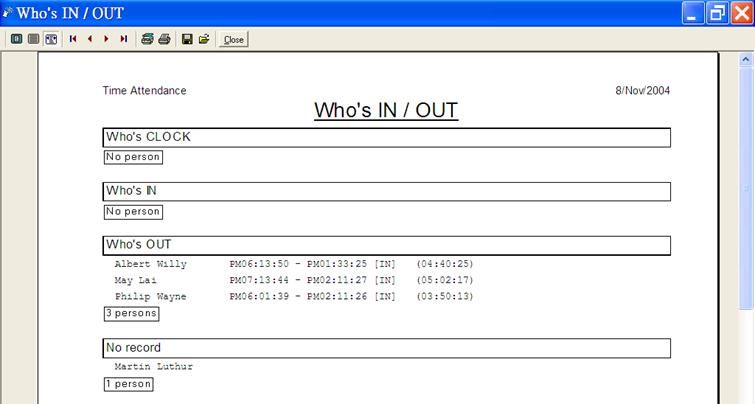
out WHO is IN the office and WHO is NOT IN (OUT) the office at a specific date.
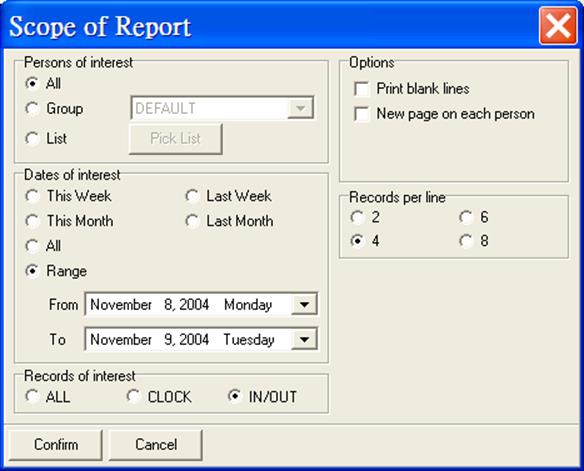
8. SPREADSHEET
The attendance
records can be processed according to the working hours and output to an EXCEL
file to further processing like payroll, appraisal, etc.
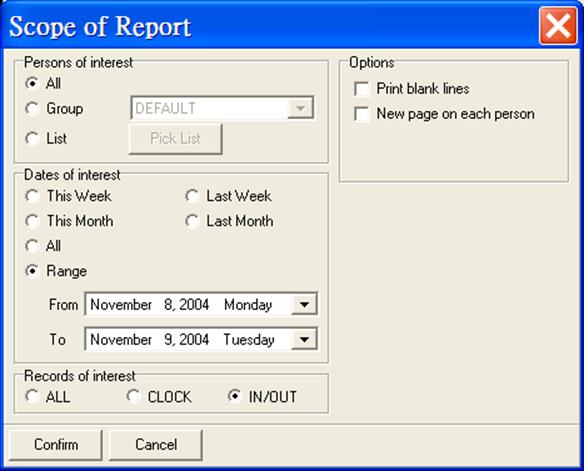
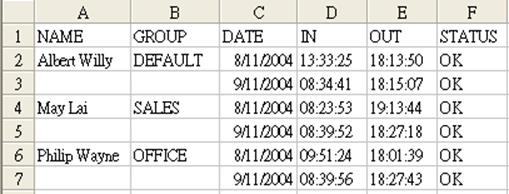
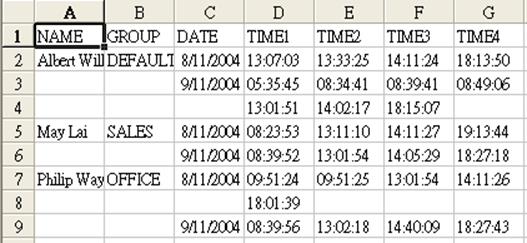
8.1 First IN / Last OUT Spreadsheet
It extracts the
first clocked data (First) and the last clocked data (Last) from selected
readers.
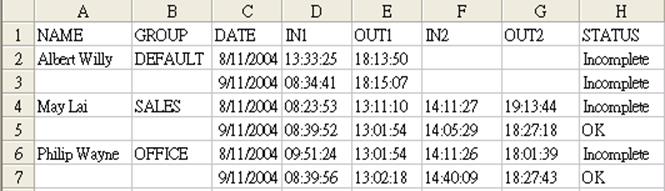
Data are grouped
into pairs which must be clock IN and clock OUT data.
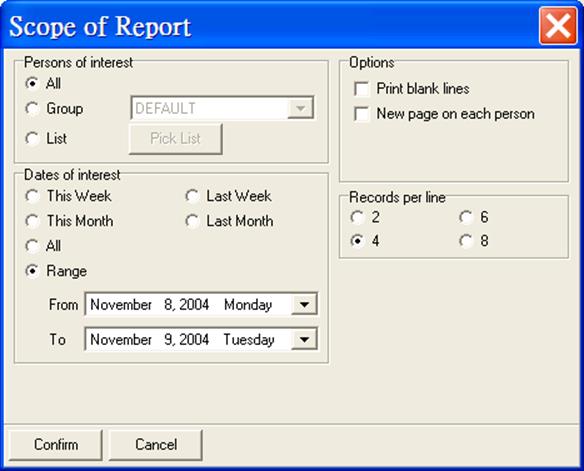
8.3 Time Logs Spreadsheet
It sorts out all
the data by employees according to the selected readers for the selected date
range.
Powerful
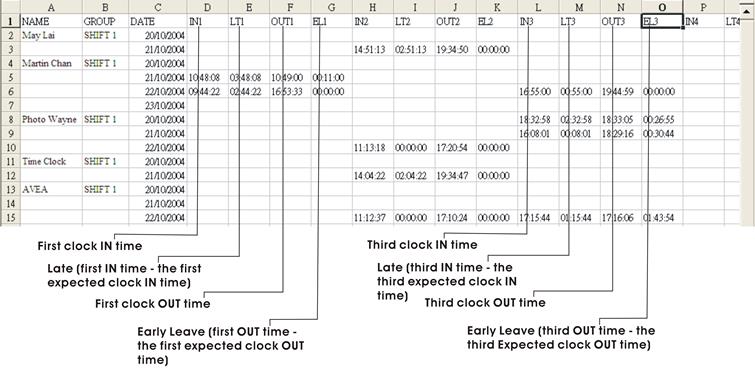
spreadsheet report for your factory��s four sessions time attendance needs. It
calculates the Late & Early Leave attendance records for at most four
sessions in a day and generates the spreadsheet according to the defined Time
Attendance Table.
Since it is an
independent report, you have to define your work time for different group of
workers for report generation.